Jumat, 30 Desember 2016

Cara Masuk BIOS Dan Boot Menu Pada Berbagai Laptop Dan PC

Tombol Masuk BIOS dan Boot Menu pada berbagai Merk Laptop dan PC.

Cara Masuk BIOS Dan Boot Menu Pada Berbagai Laptop Dan PC
ACER
F2 (BIOS Setup)
F12 (Boot Device Options)
ALT + F10 (Acer eRecovery)

Cara Masuk BIOS Dan Boot Menu Pada Berbagai Laptop Dan PC
ASUS
ESC (Boot Selection Menu)
F9 (Asus Laptop Recovery) 

Apple (Model 2006+)
Command + Option + P + R (PRAM and NVRAM Reset)
Command + S (Boot into Single-User Mode)
Command + V (Boot with Verbose Status)
Option (Select Hard Drive Boot Volume)
Option + N (Boot Image from Netboot Server)
Shift (Boot into Safe Mode)
(Boot from CD Drive)
(Boot from OS/X Recovery and perform Hardware Test)
(Boot from Network)


Cara Masuk BIOS Dan Boot Menu Pada Berbagai Laptop Dan PC
DELL
CTRL + F11 (Dell™ PC Restore by Symantec)
F8 (Repair Your Computer) Dell Factory Image Restore 


Cara Masuk BIOS Dan Boot Menu Pada Berbagai Laptop Dan PC
EI Systems
F10 (System Recovery)


Cara Masuk BIOS Dan Boot Menu Pada Berbagai Laptop Dan PC

FUJITSU
F2 (BIOS Setup)
F12 (Boot Menu) 


Cara Masuk BIOS Dan Boot Menu Pada Berbagai Laptop Dan PC
Gateway
F2 (BIOS Setup)
F11 atau R (Gateway Recovery)


Cara Masuk BIOS Dan Boot Menu Pada Berbagai Laptop Dan PC
HP / Compaq Desktops
F9 (Boot Device Options)
F10 (Setup atau HP Recovery)

HP Pavilion / Compaq Laptops
ESC (Startup Menu)
F1 (System Information) 
F2 (System Diagnostic)
F9 (Boot Device Options)
F10 (BIOS Setup)
F11 (System Recovery)


Cara Masuk BIOS Dan Boot Menu Pada Berbagai Laptop Dan PC
IBM ThinkPad
F11 (IBM Product Recovery)


Cara Masuk BIOS Dan Boot Menu Pada Berbagai Laptop Dan PC
Intel NUC
F2 (System Setup)
F7 (BIOS Update)
F10 (Boot Menu)


Cara Masuk BIOS Dan Boot Menu Pada Berbagai Laptop Dan PC
Lenovo
 (Lenovo OneKey Rescue System)
F2 (BIOS Setup) 


Cara Masuk BIOS Dan Boot Menu Pada Berbagai Laptop Dan PC
Packard Bell
F11 (Recovery Program)

Cara Masuk BIOS Dan Boot Menu Pada Berbagai Laptop Dan PC
Samsung
F2 atau DEL (Setup Utility)
F8 atau F10 (Boot Menu)


Cara Masuk BIOS Dan Boot Menu Pada Berbagai Laptop Dan PC
Sony Vaio
Assist + Power (BIOS)
F10 (VAIO Recovery Wizard)


Cara Masuk BIOS Dan Boot Menu Pada Berbagai Laptop Dan PC
Toshiba
0 atau Zero (Toshiba Harddrive Recovery Utility)
F2 (Setup Utility)
F8 (Advanced Boot Options Menu)
F12 (Boot Menu)

Dikutip dari : http://www.nalhacker.com/2015/08/Cara-Masuk-BIOS-Dan-Boot-Menu-Pada-Berbagai-Laptop-Dan-PC.html#ixzz4UOPMoflt

Selasa, 27 Desember 2016

KONFIGURASI DASAR MIKROTIK DENGAN MODEM INDIHOME

KONFIGURASI DASAR MIKROTIK DENGAN MODEM INDIHOME


TOPOLOGY :
topologi jaringan warnet
Menentukan Network di Jaringan Lokal:
Setelah mengetahui topology yang akan kita gunakan seperti apa, baru lah menentukan network yang akan di gunakan untuk jaringan lokal kita. Beberapa modem indihome yang DSI jumpai, seperti ZTE, Huawai dll, kebanyakan menggunakan IP class C dan Network yang di pakai biasanya 192.168.0.0/24, 192.168.1.0/24,192.168.100.0/24 .. jadi sebaiknya ketika anda menentukan network untuk jaringan lokal anda gunakan lah di luar network tersebut.
Misal, DSI anggap kita memilih network 192.168.2.0/24
192.168.2.1/24 IP yang akan kita gunakan pada MikroTik sekaligus sebagai gateway setiap komputer-komputer warnet kita.

SETTING MIKROTIK DENGAN INDIHOME

Sesudah anda menentukan IP yang akan di pakai untuk jaringan warnet anda, sekarang kita lanjut untuk melakukan setting mikrotik dengan topology dan network yang sudah di tentukan di atas.
Sebaiknya Reset terlebih dahulu mikrotik anda baik secara manual atau NetInstall.
Hubungkan semua perangkat, seperti modem (port1) ke mikrotik (ether1), Hub ke mikrotik (ether2) seperti topology di atas.
  • Buka Winbox anda, lakukan login menggunakan mac-address, Lihat gambar berikut:
    1_konfigurasi_mikrotik
  • Hapus “Remove Configuration”, ini biasanya muncul karena kita habis melakukan hard reset / manual reset.
    2_konfigurasi_mikrotik
  • Bikin Dhcp-client, bertujuan kita tidak perlu input manual statik ip pada mikrotik, alasannya kadang kita tidak tau berapa ip modem yang sebenarnya, dengan melakukan dhcp-client kita bisa langsung membuat default route dan tau ip modem. Syarat utamanya adalah, settingan pada modem indihome masih standar belum di rubah sedikitpun, karena secara default modem indihome dhcp-server nya sudah di aktifkan. caranya bisa lihat di bawah ini:
    3_konfigurasi_mikrotik
  • Setting Dns di mikroti, lihat gambar berikut:
    4_konfigurasi_mikrotik
  • Buat lah NAT (Network address translation) dan lakukan hanya pada interface yang mengarah ke public. Tujuan Nat sendiri berfungsi untuk penerjemah alamat IP public ke alamat IP private atau sebaliknya. sehingga dengan adanya NAT setiap komputer pada jaringan Lokal dapat mengakses internet. Lihat gambar berikut:
    5_konfigurasi_mikrotik
  • Sampai disini kita bisa test ping lewat terminal winbox, pastikan sampai tahap ini ping sudah replay semua
    Cara Setting Mikrotik dengan indihome
  • Atur IP mikrotik pada interface (ether2) yang terhubung ke HUB , yang nantinya IP tersebut menjadi gateway tiap komputer.
    7_konfigurasi_mikrotik
  • Skrang kita setting IP pada komputer yang akan mau di pake, saya contohkan disni pada komputer billing dengan IP 192.168.2.2 netmask 255.255.255.0 gateway 192.168.2.1, untuk PC yang lain silahkan anda tentukan sendiri yang terpenting masih dalam subnet yang sama
    Cara Setting Mikrotik dengan indihome
  • Lakukan ping pada komputer anda, jika replay maka anda sudah berhasil konfigurasi pada mikrotik dan komputer anda.
    Cara Setting Mikrotik dengan indihome
Manajemen Bandwidth pada Mikrotik:
Jika pada tahap konfigurasi mikrotik anda selesai dan sudah di pastikan sudah bisa di pakai untuk internetan, maka kini DSI coba kasih tips sederhana untuk limit bandwidth tiap komputer menggunakan ‘simple queue’, copy script di bawah ini kemudian pastekan ke dalam “terminal” winbox :
1
2
3
4
/queue simple
add max-limit=1M/10M name=Global target=192.168.2.0/24
/
for dsi from 2 to 10 do={/queue simple add name="PC-Client-$dsi" target="192.168.2.$dsi" max-limit=384000/512000 parent=Global}
  • Untuk jumlah bandwidth yang DSI contoh kan adalah 10 M download dan 1 M upload, dan untuk network LAN 192.168.2.0/24 , limit tiap PC 512k download 384 upload. jika keadaan sebenarnya berbeda di tempat anda, tinggal anda sesuaikan saja
  • Script di atas adalah untuk generate otomatis simple queue, yang tujuannya adalah untuk range IP 192.168.2.2-10, jika pada jaringan anda lebih dari itu atau urutan ip nya berbeda silahkan sesuaikan di bagian “2 to 10” pada script di atas, misal range di LAN anda 192.168.2.100-192.168.2.115, maka rubah lah menjadi “100 to 115”.
Seperti ini hasil dari simple queue yang sudah kita setting mikrotik dengan indihome:
Cara Setting Mikrotik dengan indihome
Demikian lah cara sederhana setting mikrotik dengan indihome fiber, dengan hanya kita melakukan limit bandwidth tiap komputer menggunakan mikrotik seperti diatas maka kita setidaknya sudah melakukan hal yang akan mengulur waktu dari yang biasa nya sudah 1 minggu kenapa FUP sekarang mungkin bisa 2-3 mingguan. Semoga tutorial sederhana konfigurasi mikrotik ini bisa membantu pembaca semua nya.
Tutorial ini memang sengaja di tunjukkan kepada pengguna mikrotik yang masih belum tau cara konfigurasi seperti apa.
Salam Sukses Selalu..
sumber : https://dokter-squid.com/setting-mikrotik-dengan-indihome/

Rabu, 13 April 2016

Desain Buku Dengan Indesign CS6

InDesign allows you to collect all documents in a Book. Using Book, you can easily synchronize styles in every document and maintain a consistent layout throughout your project. In this tutorial, we will create a book made from 3 chapters, complete with Table of Content, Introduction, and a Cover. You will learn the concepts of InDesign, from applying styles, adding page numbers, warping text, using variables and master pages. Let's get started!
Lets start by creating a new document (File > New). Use size Legal-Half, with 3 columns.
create complex pattern using smart object and nudging
We will use this document as our first chapter. The file name should be the same as the chapter, in our case "Basic of InDesign".
create complex pattern using smart object and nudging
First, we need to define a master page. In the Pages Panel, right click and choose New Master. Name the new master page "B-First". We will use this master page for every first page of a chapter.
create complex pattern using smart object and nudging
In the Pages Panels, double click the "B-First" thumbnail to edit it. Activate the type tool and drag to create a text frame.
create complex pattern using smart object and nudging
Right click on the text frame and choose Text Frame Options. Select Align: Center. This setting will center everything inside the text frame .
create complex pattern using smart object and nudging
Double click the text frame to insert text. We wont use static text here, instead we will use a variable. Click Type > Text Variables > Insert Variable > Chapter Number. We will have 1 set, because this is the chapter number of the document. From the option bar select Align Center.
create complex pattern using smart object and nudging
Let's change the chapter number character using Character Styles. Open the Character Styles panel and click the Create New Style icon.
create complex pattern using smart object and nudging
Double click New Character Style to edit it. Change the name to "Chapter Number" and change the font setting in Basic Character Formats, you can use the image blow as a guide.
create complex pattern using smart object and nudging
Select the chapter number and click Chapter Number style to apply the new style.
create complex pattern using smart object and nudging
The "B-First" master page is now created. In the Pages Panel, double click Page 1 to return to a normal page. Currently page 1 is still using Master Page A, indicated by A in the top corner. Apply "B-Fist" to the first page by dragging it onto the first page's thumbnail.
create complex pattern using smart object and nudging
If you don't see rulers around the page press Control + R to bring them up. Drag a horizontal guide out from the ruler. Use the guide to create a text frame on top of the page. Right click the text frame, choose text Frame Options, and set the Vertical Justification to Align to Center. We will use this text frame for the chapter title.
create complex pattern using smart object and nudging
Again, we will not be using static text here. Remember that earlier, we named this document as Chapter Title. So, click Type > Text Variables > Insert Variable > File Name.
create complex pattern using smart object and nudging
Currently, the chapter title has basic formatting. Let's create a paragraph style for it. In the Paragraph Styles Panel, click the Create New Style icon. Double click to edit it. Name the style "Chapter Title". Use the settings shown below.
create complex pattern using smart object and nudging
Apply the New Paragraph style and see it changes. If you don't like it, you can always edit the style again.
create complex pattern using smart object and nudging
Let's add some place holder text for the content. Go to lipsum.org and click on Generate Lorem Ipsum button. Select the lorem ipsum generated paragraph and press Ctrl + C to copy.
create complex pattern using smart object and nudging
Create a text frame and paste in the lorem ipsum text. You may find a plus sign at the bottom of the Text Frame. This sign indicates that there's some text hidden inside the text frame, don't worry about this for now, we will be editing the text later.
create complex pattern using smart object and nudging
In the Pages Panel add a new a page by clicking the New Page icon. Apply "Master Page A" for the new page.
create complex pattern using smart object and nudging
Create another text frame, the unseen text from the first frame will overflow into this frame. If it doesn't click on the red plus sign with the text tool and then click into the new text frame.
create complex pattern using smart object and nudging
Add a heading and sub heading to the dummy text.
create complex pattern using smart object and nudging
Create new Paragraph Style named "Body". Use the following settings.
create complex pattern using smart object and nudging
Apply the new paragraph to the dummy text to see its result.
create complex pattern using smart object and nudging
Let's create two new paragraph styles for the heading and sub heading. "Head 1" for the heading and "Head 2" for the sub-heading. In General, make sure you set "Based On: Body" for both styles.
create complex pattern using smart object and nudging
Apply the new paragraph styles, here's my result.
create complex pattern using smart object and nudging
In the previous step, we set "Head 1" and "Head 2" to "Based On: Body". What was that for? Let's try an experiment. Double click on the Body Paragraph style to edit it. Change the Font Family to something different. Make sure you select the Preview check box to see the result in real time.
create complex pattern using smart object and nudging
We can see that the font family in the heading and sub-heading have changed with the changes in Body Paragraph style.
create complex pattern using smart object and nudging
Let's learn how to wrap text. Create a text frame in the third column. Open Text Wrap and select the second icon to warp text around the box.
create complex pattern using smart object and nudging
Drag a picture onto your document. Add Wrapping from the Text Wrap panel.
create complex pattern using smart object and nudging
This is now in our first chapter.
create complex pattern using smart object and nudging
The one thing we're missing is the footer. We want the footer to appear in every page that uses "A Master Page". Double click the "Master Page A" in the Pages panel to edit it. We will create a footer with dynamic content using variables. Click Type > Text Variables > Define. Click New, use the Name: Book Title, Type: Custom Text. Insert "VectorTuts+ Book" for the value.
create complex pattern using smart object and nudging
Create a text box on left page corner and select Left Align. For the content, click Type > Insert Special Character > Markers > Current Page Number, add space, click Type > Insert Special Character > Hyphens and Dashes > En Dash, add space, click Type > Insert Variables > Book Title.
create complex pattern using smart object and nudging
Create another text frame in the right corner and select Right Align. For the content click Type > Insert Variables > File Name, add space, click Type > Insert Special Character > Hyphens and Dashes > En Dash, click Type > Markers > Current Page Number.
create complex pattern using smart object and nudging
In the Master Page the page number is represented by the letter A. If you return to the normal page you'll see that the page number has changed to the actual page number.
create complex pattern using smart object and nudging
To create another chapter, we can just duplicate the previous one, then change the title and content. For this tutorial, let's create three chapters.
create complex pattern using smart object and nudging
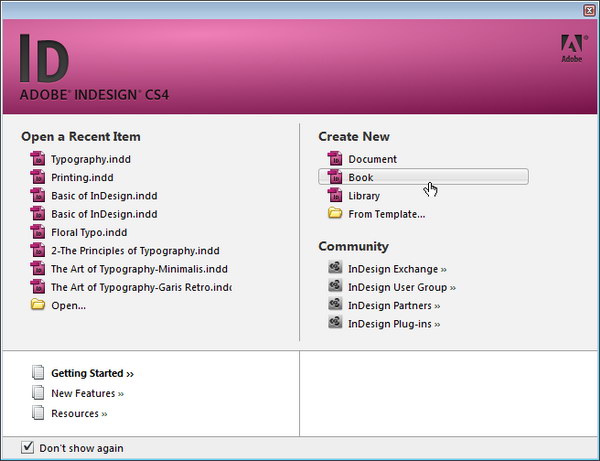
Let's start collating the chapters into a book. Create a new book from the menu File > New > Book or click Book in the Welcome Box (shown below). Name the book "Vectortuts Book". At first you may be confused, book is not a normal InDesign file. Book is not a document where you can add text or a page, book is a collection of documents that can share styles, swatches, master pages, and other items.
create complex pattern using smart object and nudging
Currently, the book is still empty. To add a document click the add icon, select the three chapters you created. You can rearrange the order of the document by dragging it. In this case, I want "Typography" in Chapter 2. So, I drag "Typography" and put it between "Basic of InDesign" and "Printing". After you rearrange the documents, by default InDesign will automatically refresh the book's page numbers.
create complex pattern using smart object and nudging
Let's see what has happened to our document. Open the chapter "Typography" by double clicking on it in the book panel. You'll find that its chapter number has automatically changed to 2. Chapter number in "Printing" has changed to 3. Also see the page number in the footer, they have changed too.
create complex pattern using smart object and nudging
If you're working with a large number of chapters, Automated Page Number updating will waste your time. To turn it off, open the book panel menu and choose Book Page Numbering Options. De-select Automatically Update Page then click OK.
create complex pattern using smart object and nudging
Create new document and name it "Table of Content". Add it to the current book.
create complex pattern using smart object and nudging
Because Auto Update Page is turned off, we need to manually update the document. Open the book panel menu and choose Update Numbering > Update All Numbers.
create complex pattern using smart object and nudging
We have a problem now, "Basic of InDesign" is considered as Chapter 2 because its position is second. We also want numbering for Chapter 1 to start from 1. To fix this, in the book panel choose "Basic of InDesign" document and choose Document Numbering Options.
create complex pattern using smart object and nudging
Set Start Page Numbering to 1 and Start Chapter Numbering to 1. Click OK..
create complex pattern using smart object and nudging
Update the numbering by opening the book panel menu and choosing, Update numbering > Update All Numbers.
create complex pattern using smart object and nudging
Open the "Table of Content" document. Let's generate a table of Contents for the book. Click Layout > Table of Content. First, make sure you select Include Book Documents. For the Title type "Contents". Double click Style Chapter Title, "Head 1", and "Head 2" to include them in the Table of Contents. Click OK. Click and drag on the document to create a text frame filled with a very basic Table of Contents.
create complex pattern using smart object and nudging
We'll modify the Table of Contents by adding some paragraph styles. Open the Paragraph Styles panel and create a new paragraph style. Edit the new paragraph style and name it "TOC Title" and use the following settings.
create complex pattern using smart object and nudging
Apply this style to the Table of Contents title.
create complex pattern using smart object and nudging
Create a new paragraph style for Chapter Title, Heading 1, and Heading 2.
create complex pattern using smart object and nudging
Apply paragraph styles to the indicated content.
create complex pattern using smart object and nudging
Once you've found the perfect style setting, edit the Table of Contents. Click Layout > Table of Content. For the Title use Style: "TOC Title", for the Chapter Title use Entry Style: "TOC Chapter Title", Head 1 use Entry Style: TOC Head 1, and Head 2 use Entry Style: TOC Head 2. Make sure you select Replace Existing Table of Contents then click OK.
create complex pattern using smart object and nudging
Create a new file named "Cover" and add it to the Book. Place this document first in the order. Create a text frame and write the book title and author. Right click the text frame and set Align: Center and add 11p0 to the bottom to move the text up.
create complex pattern using smart object and nudging
Copy one of the book chapters and change its file name to Introduction. Add the file to Book, place it second after "Cover" then open it. This document is created as an introduction to the book and is not part of the content. Therefore, we don't need a page number in its first page. To fix this, we'll override the master page object. Hold Shift + Control then click the chapter number to select it. Press Delete to delete it.
create complex pattern using smart object and nudging
Let's change the numbering in the Introduction and Table of Content to a Roman style. In the book panel select both documents, open the panel menu and select Document Numbering Options. Select Style: i, ii, iii, iv... to use the Roman style. Update page numbering by opening the panel menu and select Update Numbering > Update All Numbers.
create complex pattern using smart object and nudging
We have another problem here. The cover has only one page and this is causing the next document to start in even pages and it doesn't match the book layout. Open book panel menu and select Book Page Numbering Options. Set Page Order: Continue on Next Odd Page. Using this setting, every document in this Book will always start at an odd page.
create complex pattern using smart object and nudging
Open the book panel menu and click Update Numbering > Update All Numbers.
create complex pattern using smart object and nudging
In the "Introduction" document. We don't want heading and subheading from this chapter showing up in the Table of Contents. Let's change the paragraph style name.
create complex pattern using smart object and nudging
Return to the "Table of Contents" document. Let's create a paragraph style for the new entry from "Introduction".
create complex pattern using smart object and nudging
Click Layout > Table of Contents. Add "Chapter Title Intro" in the include Paragraph Styles list. Position it on top in level 1. Use Entry Style "TOC Intro". Select Page Number: "No Page Number", we don't need page numbers for this setting.
create complex pattern using smart object and nudging
Click OK and you'll see that we just added "Introduction" to the beginning of the Table of Contents.
create complex pattern using smart object and nudging
Book helps us maintain a consistent layout throughout our project. What happens if I decide to change the font inside the book? Open "Basic of InDesign". Open paragraph style Body and change the font family to Calibri.
create complex pattern using smart object and nudging
Click OK and you'll see that all text is now in Calibri.
create complex pattern using smart object and nudging
To apply changes to the entire document we need to Synchronize Documents. First, set the source file that will be used, in our case "Basic of InDesign", by clicking the icon box in front of it. Open the book panel menu and choose Synchronize Options.
create complex pattern using smart object and nudging
In the dialog box, select the object that we will synchronize, in this case the Paragraph Styles. Click OK.
create complex pattern using smart object and nudging
Open the other chapter and see what happens. All the body text is now in Calibri.
create complex pattern using smart object and nudging
What if we want to change the footer text from "Vectortuts+ Book" to "Tuts+ Book"? Because the text is taken from the Variable" Book Title" we can just change the value and synchronize it with other documents. Click Type > Type Variables > Define. Select "Book Title" and click the Edit button. In the next dialog change the Text to Tuts+ Book.
create complex pattern using smart object and nudging
Open the panel book menu and choose Synchronize Options. Select Text Variables then click OK.
create complex pattern using smart object and nudging
Here's what we have in the footer of the document.
create complex pattern using smart object and nudging
Once you're done with the book you need to send the final result to the publisher. Problems may happen if you copy and paste the INDD file. Some files or fonts may be missing. To ensure you include everything that's needed by the printer, you need to package your book. In the Book Panel select all documents and select Package Book For Print.
create complex pattern using smart object and nudging
InDesign will give you a summary about your document. Click Package to continue the packaging process.
create complex pattern using smart object and nudging
Name your folder and press Package.
create complex pattern using smart object and nudging
All your documents will be placed in one centralized folder. All links in the document have been fixed and fonts used in the document have been included. There will also be a text file named "Instructions" containing detailed information about your document. The next thing to do is zip the folder and send it to your publisher.
create complex pattern using smart object and nudging
If for some reasons your publisher can't use the InDesign file, you can send them the book in PDF. To create a PDF file from the book, select all documents, open the panel menu and choose Export Book to PDF.
create complex pattern using smart object and nudging
Advertisement
Make sure you ask which PDF setting you publisher requires. Each publisher may have different setting. In most cases, you can just use the Press Quality preset.
create complex pattern using smart object and nudging
We can see here that the Book feature is very effective in creating a book with many chapters. With Book you can easily maintain a consistent layout in every document. Finally, I hope you enjoyed this tutorial and learned something new.
*sumber : http://design.tutsplus.com/tutorials/writing-effectively-in-indesign-using-book--vector-3711